How to Complete the Venom Testnet Campaign and Claim Your Free NFTs

What is Venom Network
In April 2023, Venom Network, a new layer-0 blockchain, launched its testnet. Despite being a newcomer in the world of layer-0 blockchains and facing competition from established giants, it shows great potential.
Developed by the Venom Foundation and supported by the Abu Dhabi Global Market (ADGM) since 2017, this project aims to provide users with a glimpse of its interface and blockchain capabilities through the Venom Testnet.
The Testnet offers newcomers to cryptocurrency the chance to explore activities like trading, swapping, buying NFTs, and making Long/Short decisions without using real money.
It’s essential to note that testnet tokens and NFTs have no real value and are for testing purposes only.
Now, let’s discover how you can complete the Venom testnet campaign goals and claim your NFT rewards.
The Venom Testnet Campaign
Collect free Venom tokens to begin your journey.
The very first thing you need to do is to create a Venom Wallet and complete the tasks to claim your first 50 Venom Tokens.
- Download Venom wallet app/extension.
- Complete the tasks.
- Claim 50 Venom tokens.
The task is simple, as you just need to follow the given accounts on X (the official Twitter). You don’t even have to follow them on X for real; you can just click on the tasks, wait for a few seconds, and then click on the “check” button to finish them.
As of the day of writing, September 2023, the 50 Venom tokens they give you are enough to do all the tasks in the campaign. But having more wouldn’t hurt, right? You can also do some extra tasks in the Venom Faucet to get more Venom Tokens.

The Tasks
In this article, we will show you how to complete the campaign based on the writer’s experience using the Venom wallet extension.
The campaign’s objective is to mint NFTs, so we will not consider the Minting NFT Step as one of the tasks.
1. Venom
There are two tasks:
- Join Venom Foundation on Telegram
- Subscribe to the Venom Foundation YouTube channel.
After finishing the tasks, click on Mint NFT. You don’t have to follow the accounts, but it’s recommended that you do, since they can keep you updated with the latest news.
Click the “Mint” button and wait for a few seconds to complete the minting process. Congratulations! You have just received your 1st Venom NFT.

2. Venom Wallet
There’s only one task for this segment:
- Send token.
- Click on the Venom wallet extension icon.
- Click send.
- Paste the address they give you in the task.
- Insert the amount of Venom tokens you want to send out.
- Enter your wallet passwords, pay the fee and wait for the transaction to go through.
You need to send any amount of Venom Tokens to a wallet address that they give you in the task. After that, you mint your 2nd NFT.

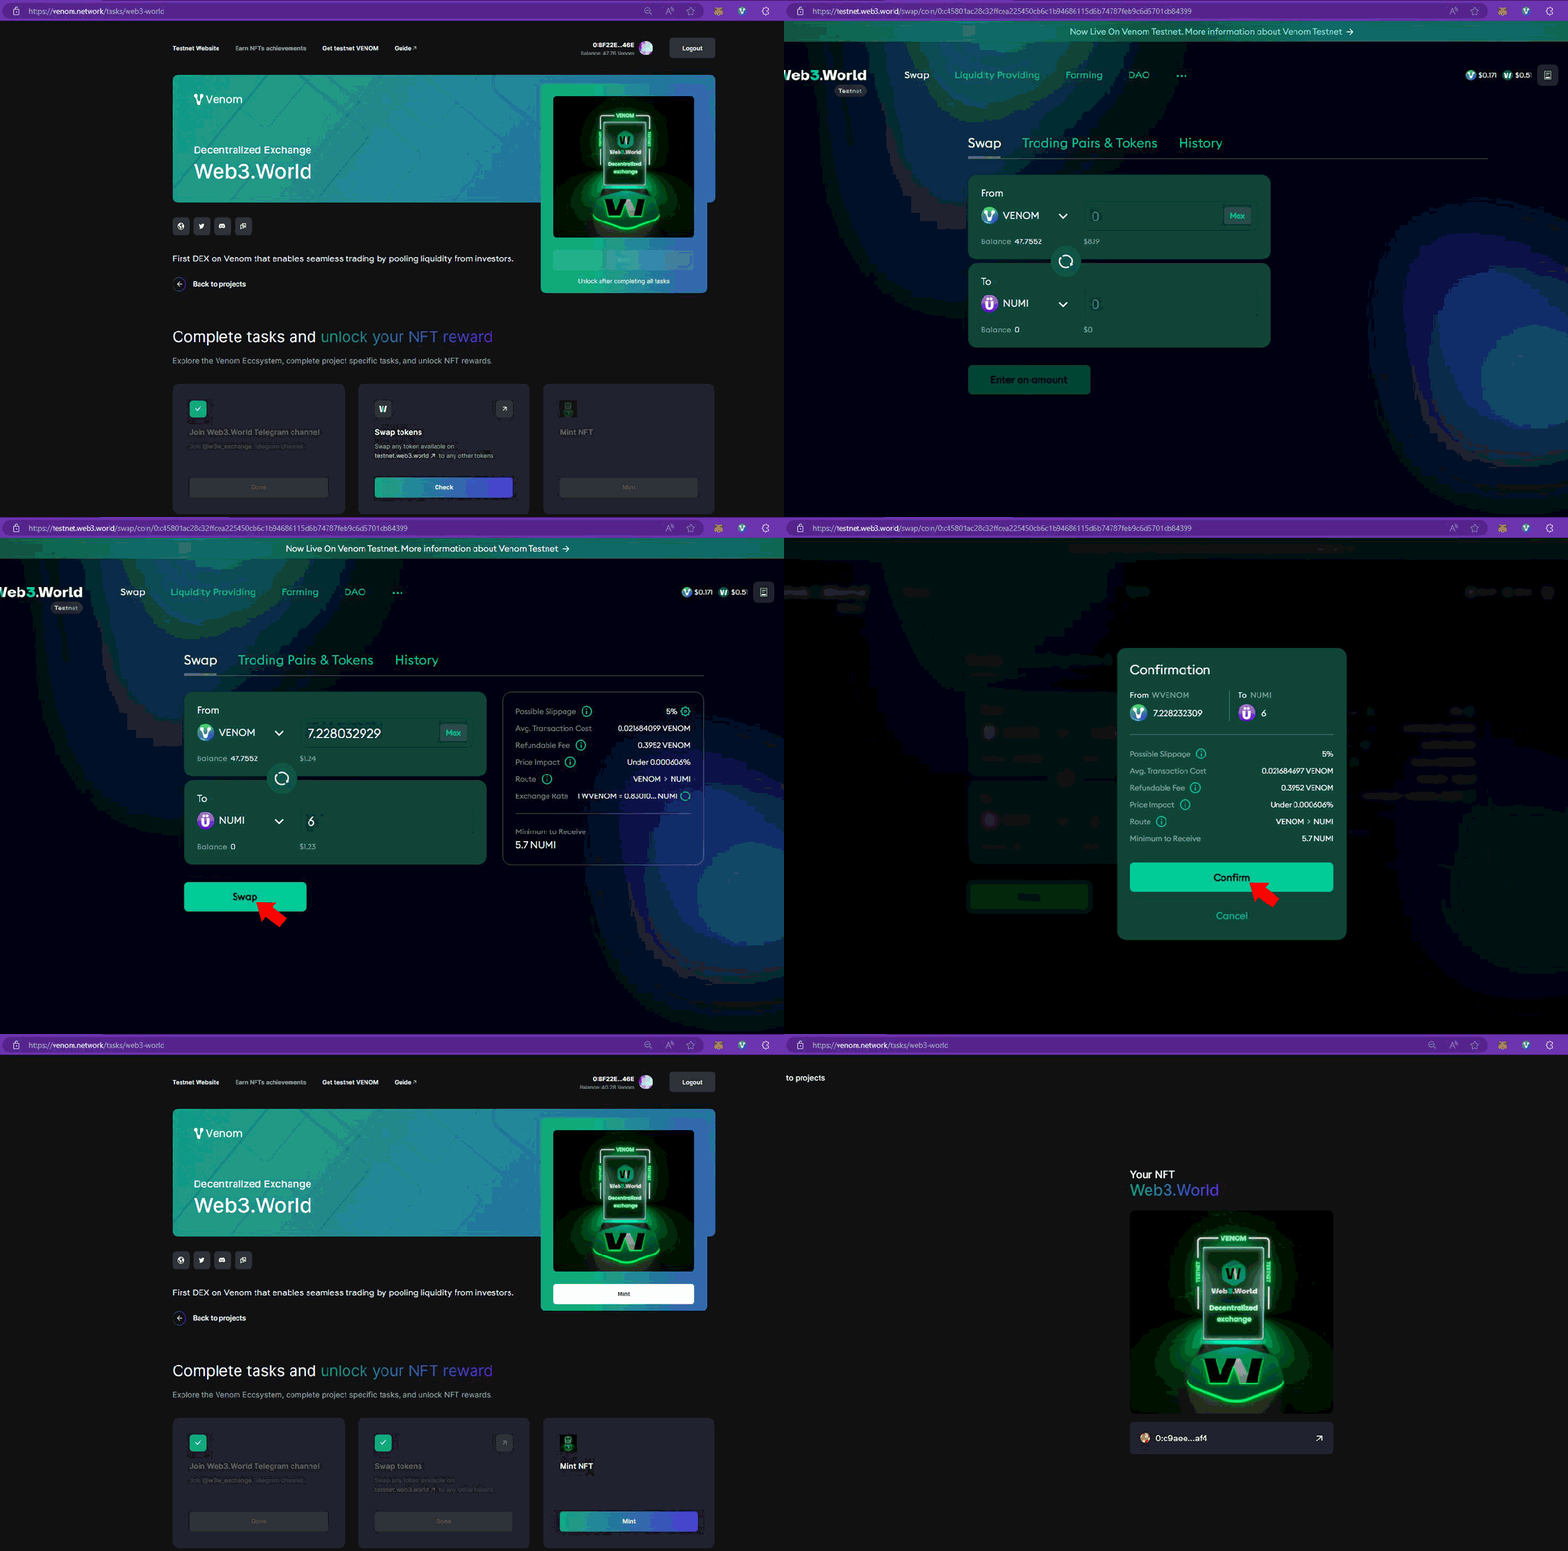
3. Web3.Wolrd (Venom Swap)
Web3.world is the first DEX on Venom that enables seamless trading by pooling liquidity from investors. You have two tasks:
- Join Web3.World Telegram channel.
- For the first task, simply click on the button to finish.
- Swap tokens.
- For the second task, you need to go to the web3.world site to swap tokens.
You can swap to any cryptocurrency you want in the list. But we recommend you have at least 5-6 NUMI tokens and some USDT (about 3 is fairly enough) since they will come in handy later on.
After you’ve done the swapping, go back to the task page and mint your 3rd NFT.
4. Venom Bridge
You need to complete three tasks:
- Join Venom Bridge Telegram channel.
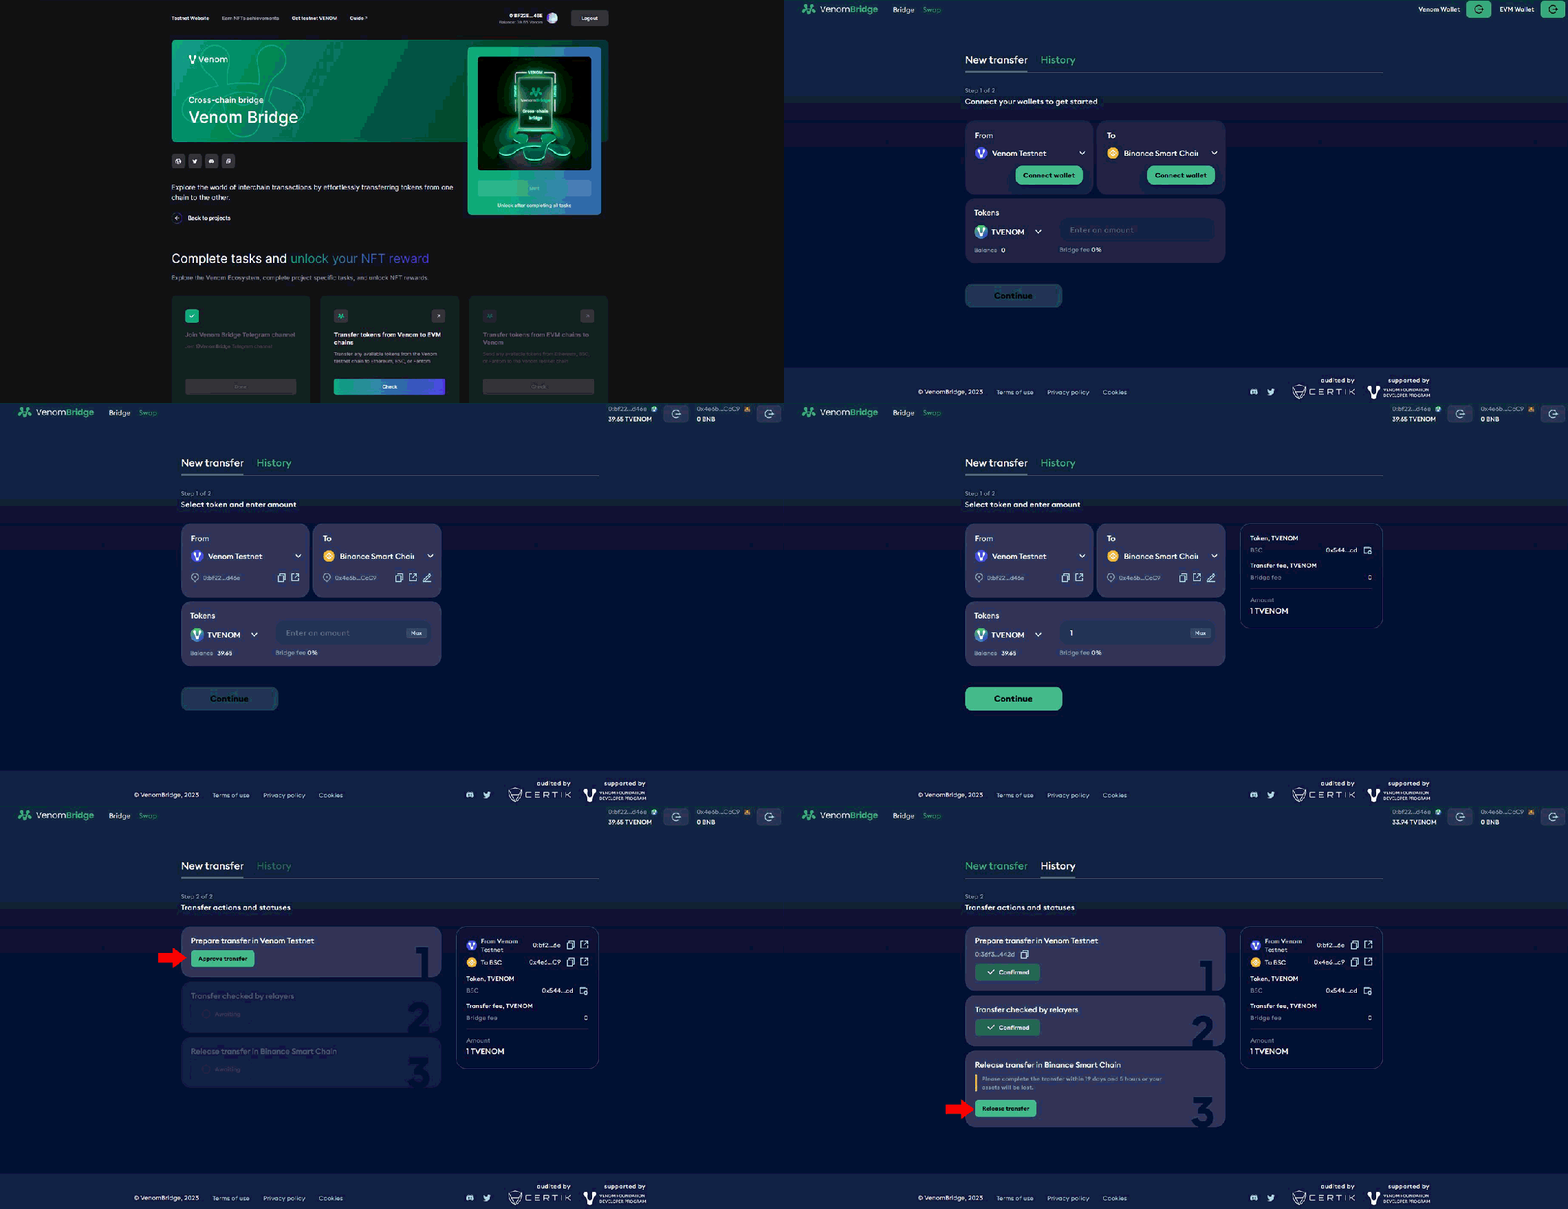
- Transfer tokens from Venom to EVM chains.
- Go to Venom Bridge website.
- Connect your Venom wallet and an EVM Wallet (We recommend using the KEYRING PRO wallet – a trusty wallet with many interesting functions and easy to use)
- Insert the amount of Venom tokens you want to bridge.
- Approve transfer.
- Wait for all the step to complete.
- Go back to the task page and click on “check” to finish.
- Transfer tokens from EVM chains to Venom.
- This is similar to the previous task but reversed.
- Using the Venom testnet token you’ve just bridged to the EVM wallet, bridge them back to the Venom wallet.
- Hit the “Check” button to finish.
For the bridging to finish, you need to have BNB in your EVM wallet to pay the fee. Don’t worry, it’s just a very small fee. The 3rd task sometimes will be a bit laggy, you can always go and complete other tasks and come back later.
Now you can mint your 4th NFT.
5. Venom Stake
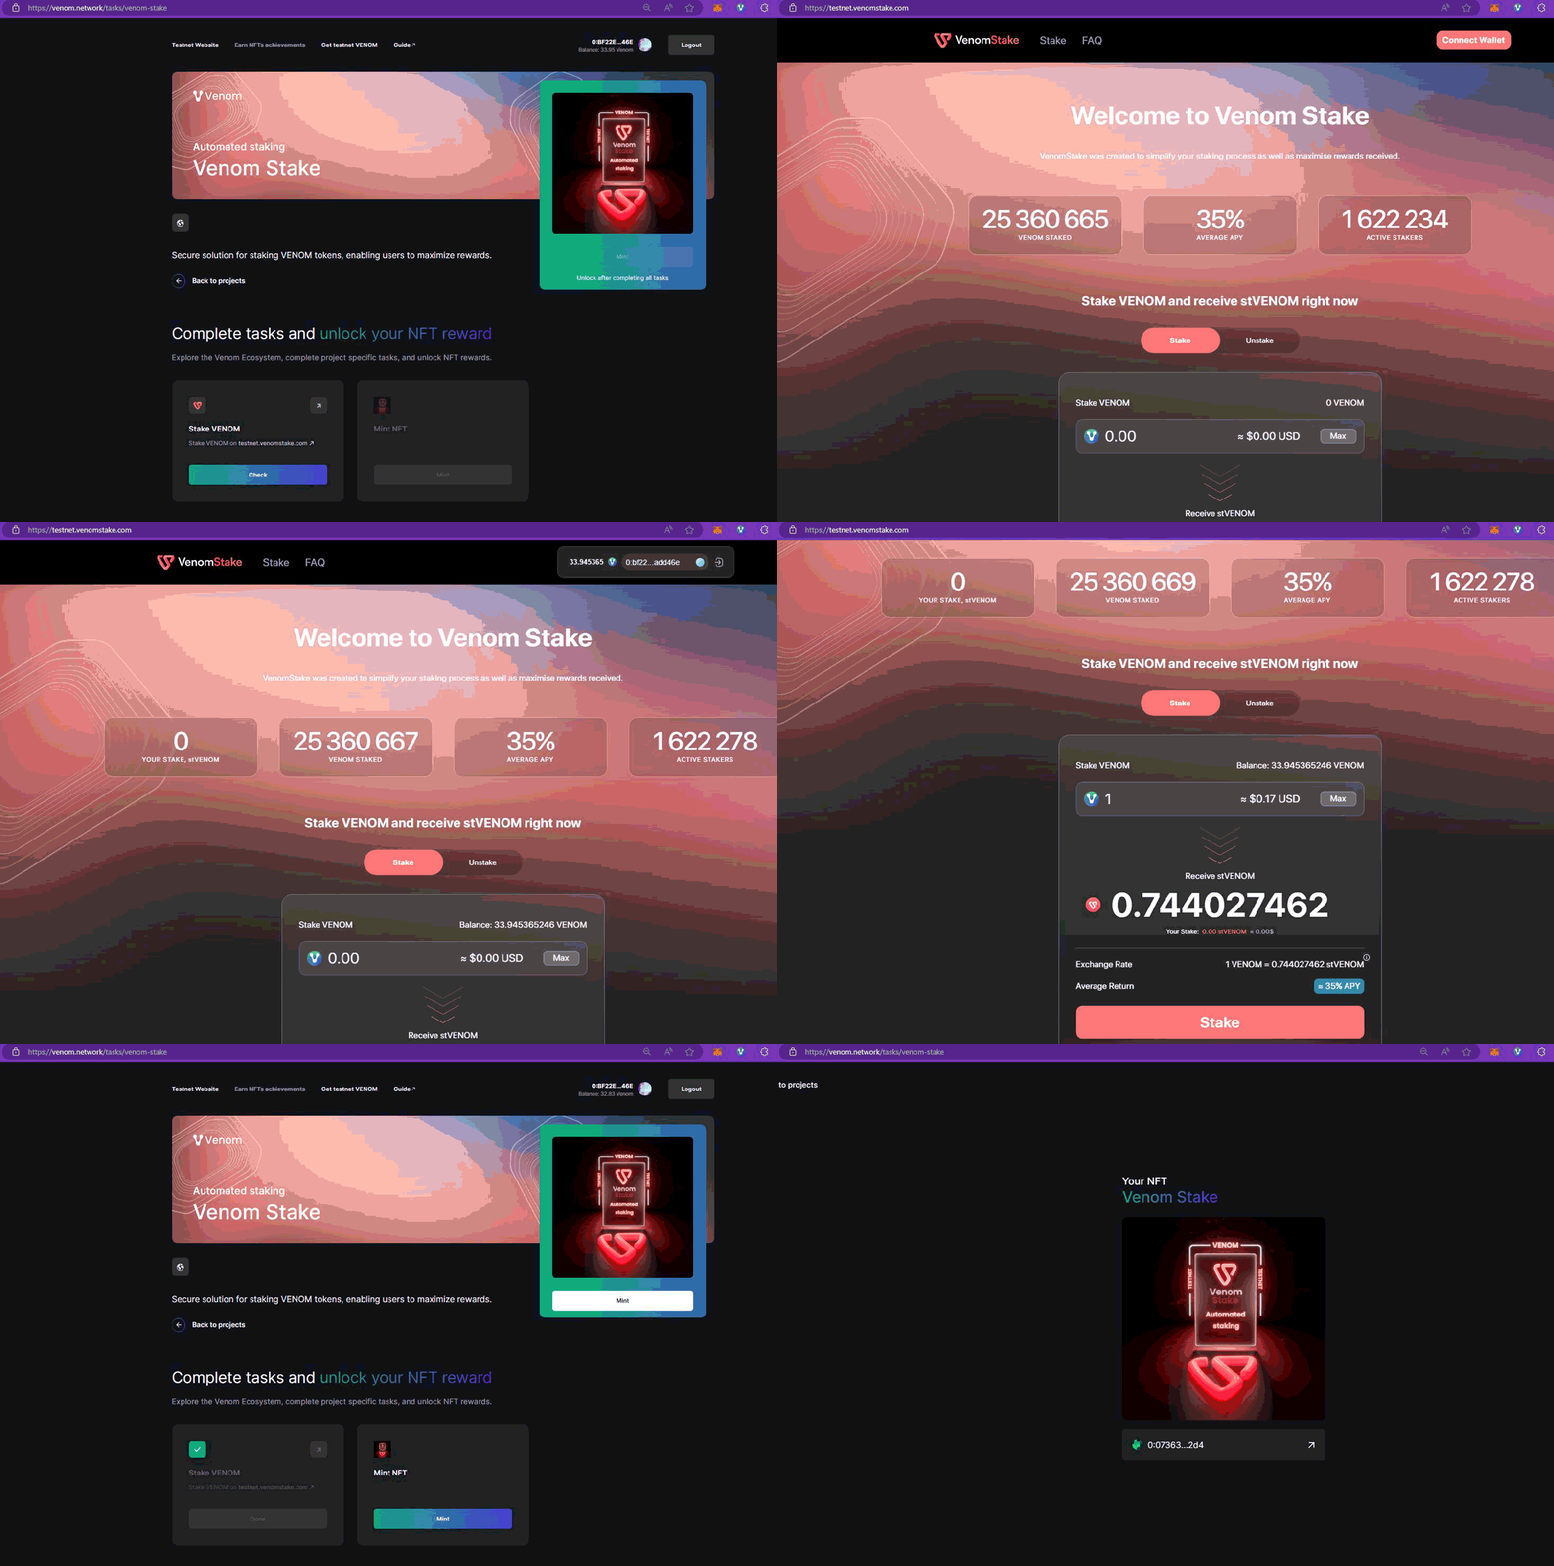
This segment only has one task to help you familiar with how staking work in the Venom Network:
- Stake Venom.
- Go to the VenomStake site.
- Connect your Venom Wallet.
- Insert the amount of Venom you want to stake.
- Enter your wallet passwords, pay the fee and wait for the transaction to go through.
After finishing the task, go back to the task page to mint your 5th NFT.
> Will Avalanche’s HyperSDK blockchain upgrade affect AVAX’s price after hitting 143K TPS on testnet?. <
> Sei Network Airdrop: How to claim your share of the Free SEI Tokens. <
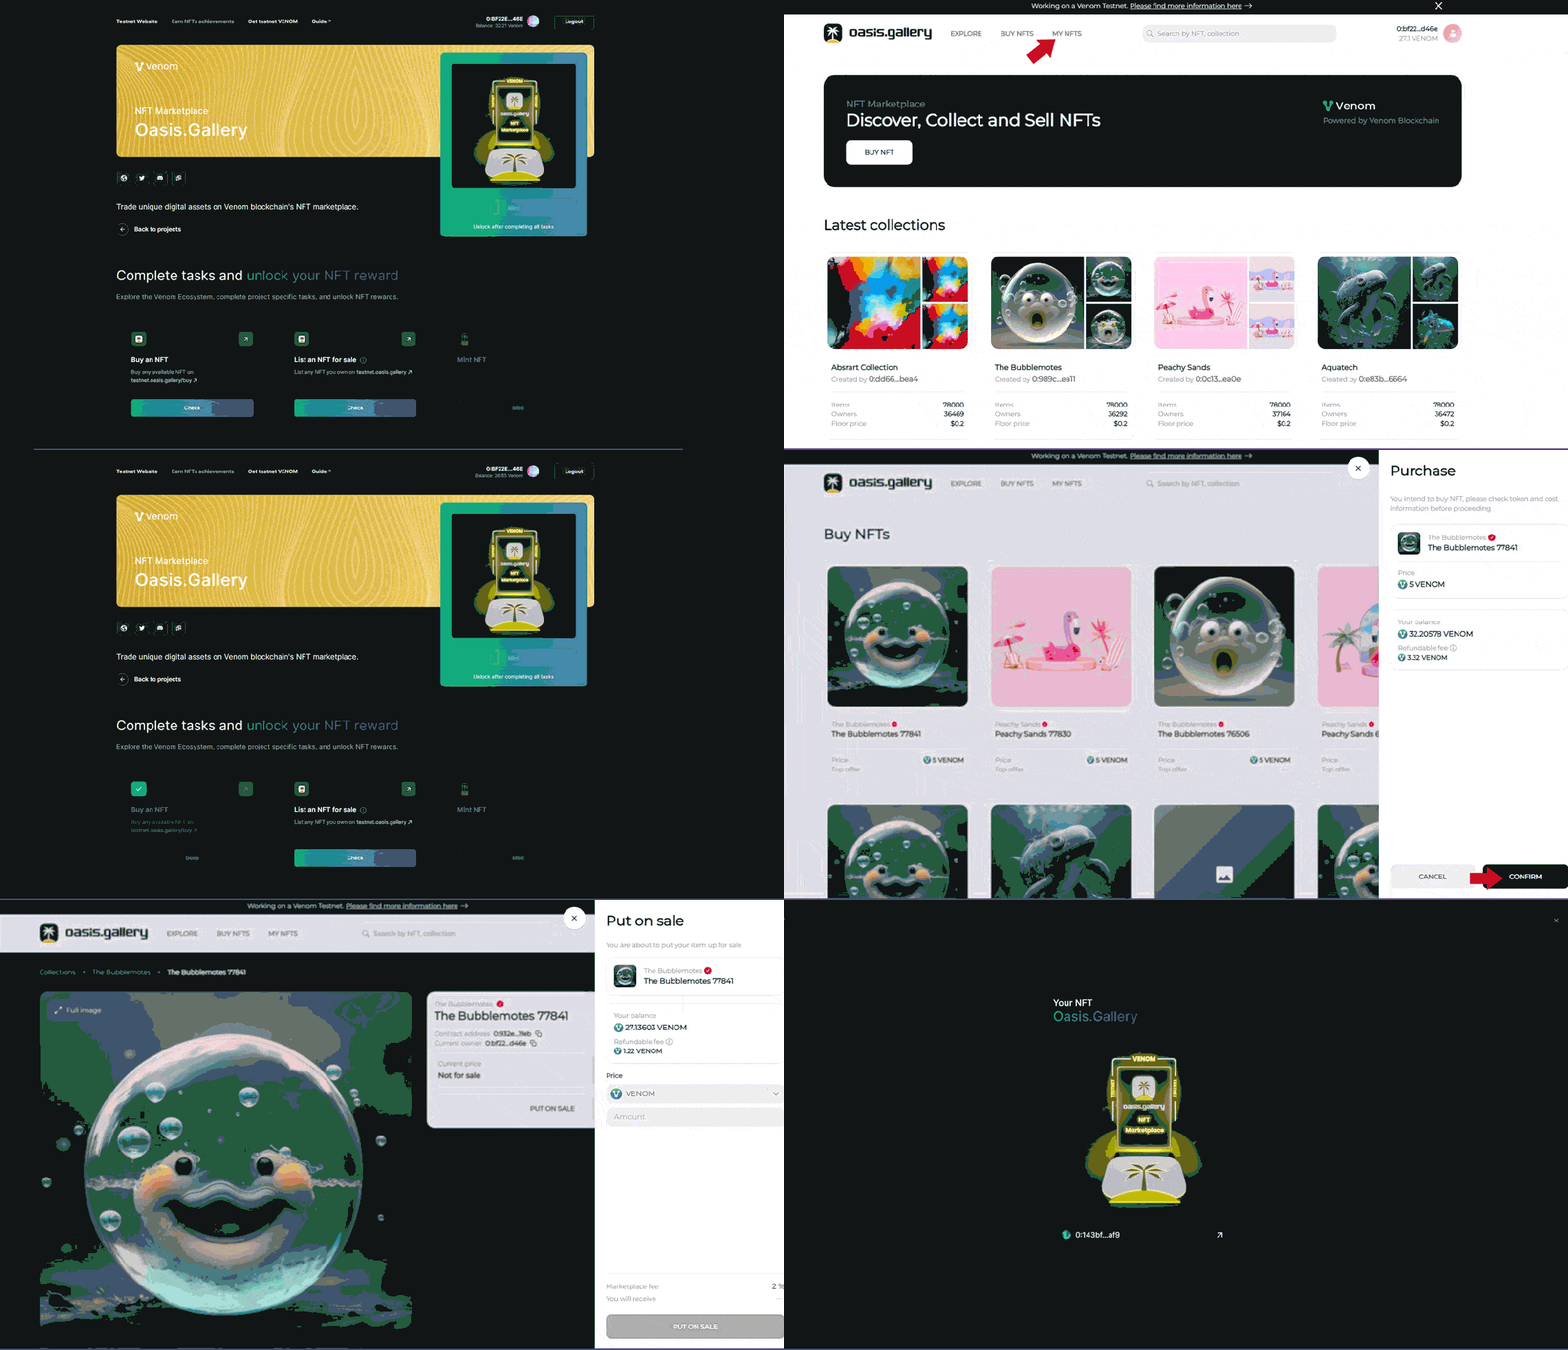
6. Oasis.Gallery
This segment contents two tasks:
- Buy an NFT.
- Go to Oasis Gallery.
- Connect your Venom wallet.
- Choose and buy the NFT you want.
- List an NFT for sale.
- After finishing buying an NFT, on the Oasis Gallery, go to “My NFTs.”
- Select the any NFT you want to sell.
- List it on the market
Go back to the task page and “check” them to finish. Then you can mint your 6th NFT.
7. VenomPad
There are two tasks for this part:
- Follow VenomPad
- Tweet about VenomPad
These are fairly easy tasks to complete since all you need to do is click on the tasks and wait for them to complete. And then you can mint your 7th NFT

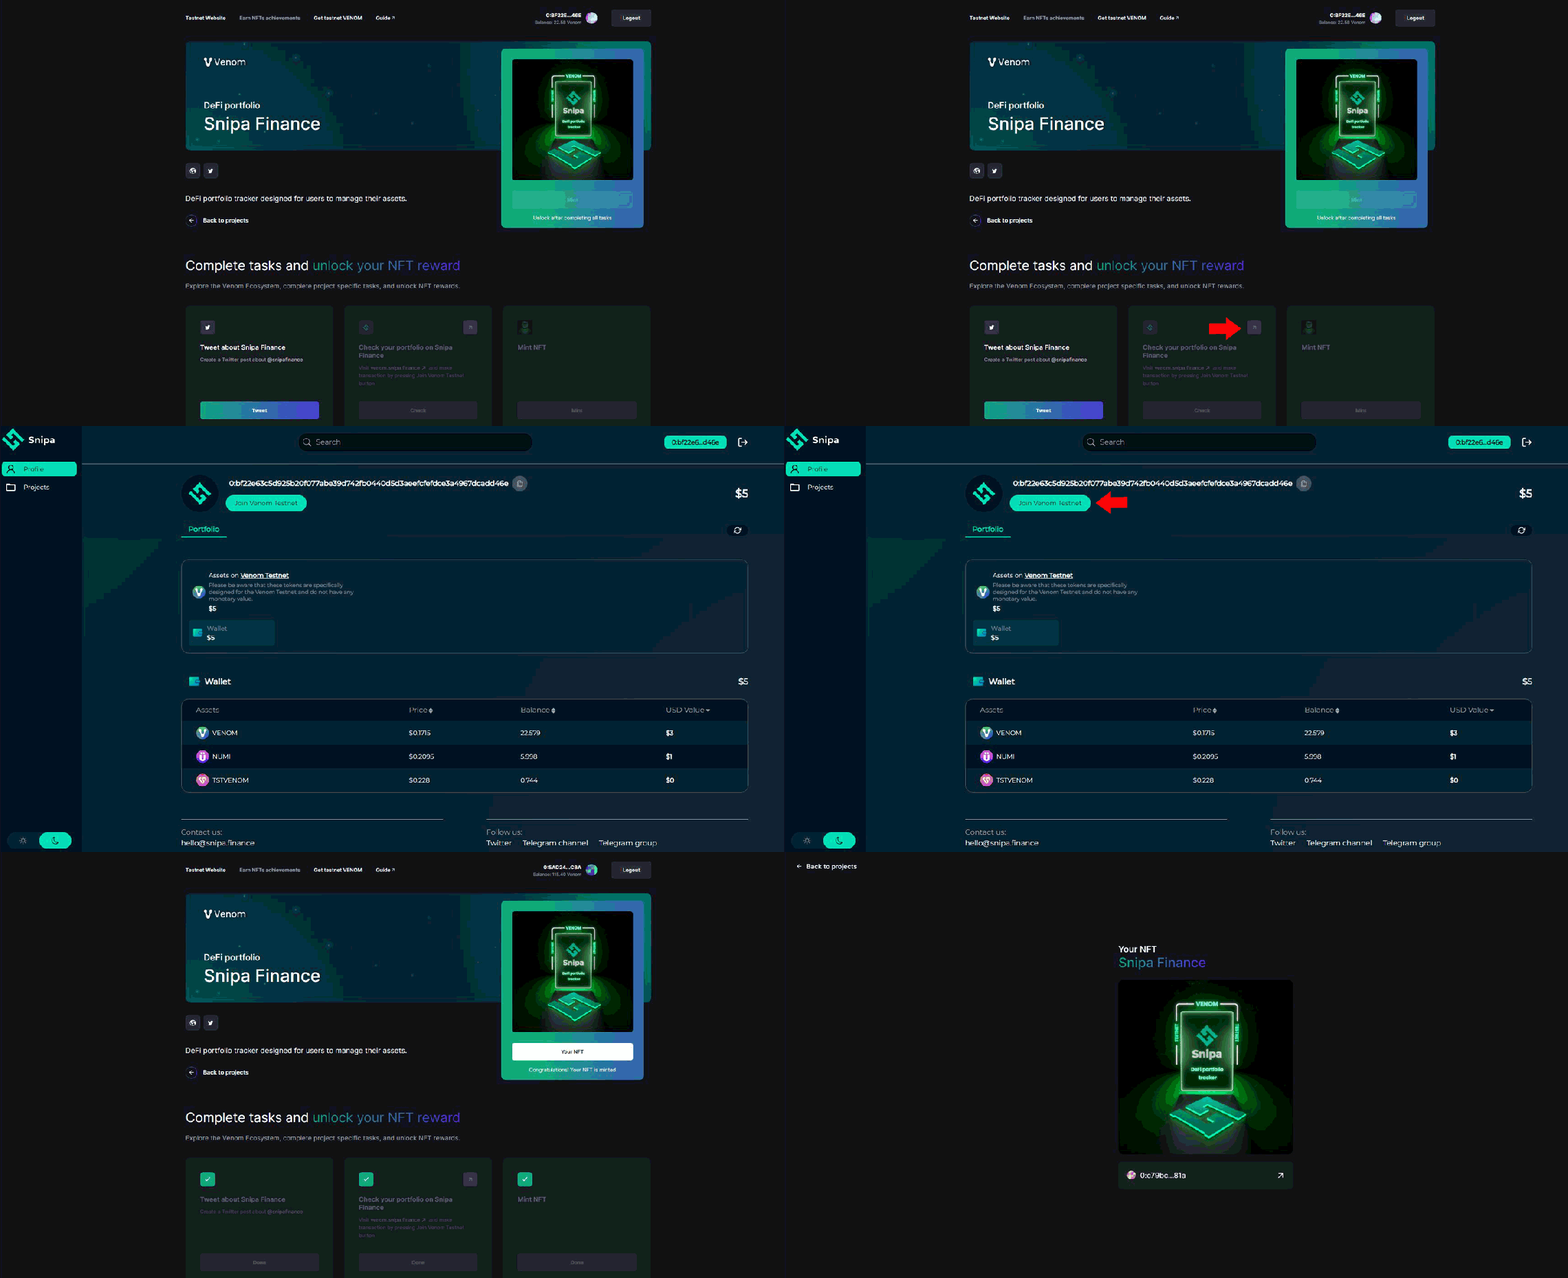
8. Snipa Finance
There are two tasks:
- Tweet about Snipa Finance
- Check your portfolio on Snipa Finance.
- Go to the Snipa Finance site linked in the task.
- Connect your Venom Wallet.
- You need to click on the “Join Venom Testnet” button to finish the task.
Go back to the task page and mint your 8th NFT.
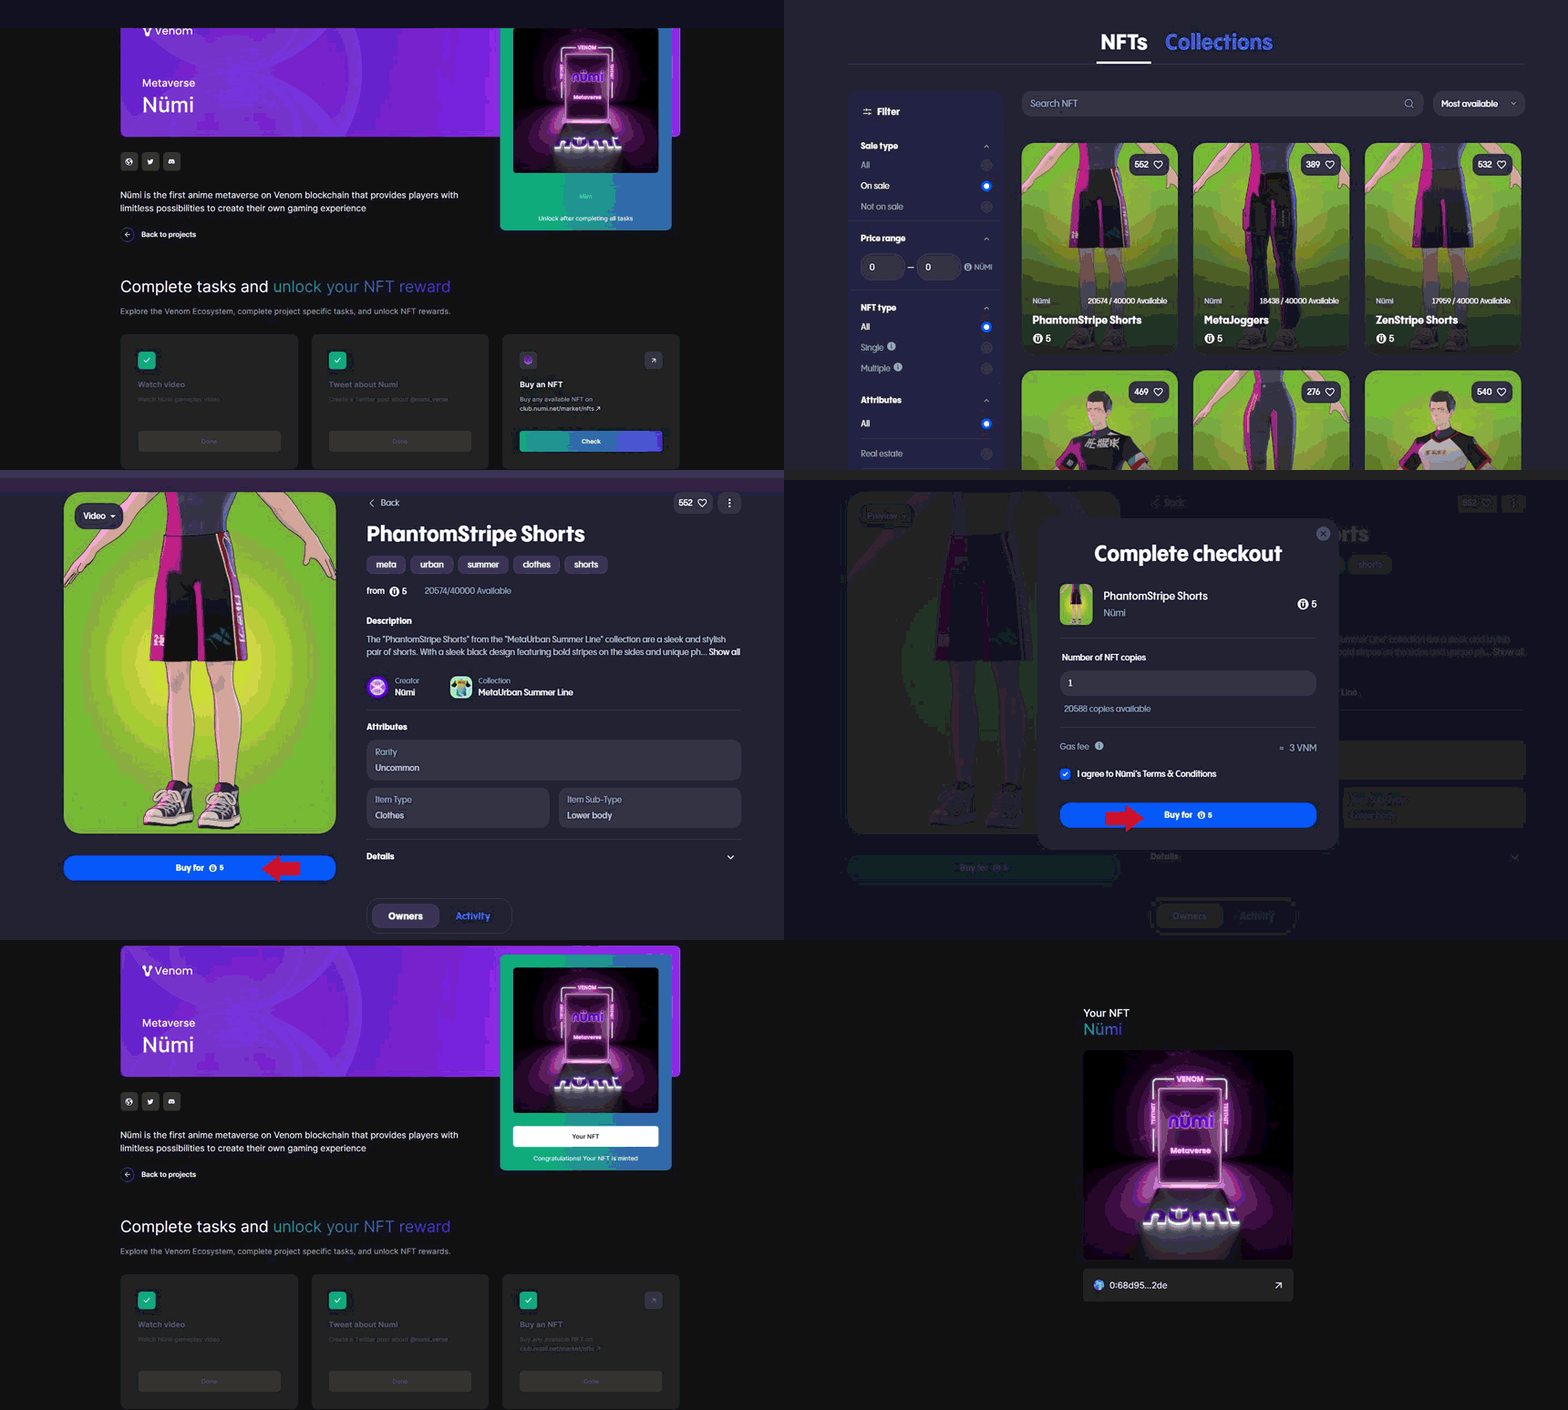
9. Numi
This segment consists of three tasks that you need to accomplish. The first two tasks are straightforward and simple, while the third task requires a few more steps.
- Watch Numi gameplay video.
- Tweet about Numi
- Buy an NFT
- Go to club.numi.net
- Connect your Venom Wallet.
- Use the Numi Tokens that you swapped in the 3rd task to buy an NFT.
After that, you can go on and mint your 9th NFT
10. Ylide
This part consists of two tasks:
- Tweet about Ylide
- Post an on-chain message.
- Go to Ylide.
- Connect your Venom Wallet.
- Just post something, anything you want. But hey, be a nice person.
All done, that’s your 10th NFT.

> Meme Coins: The Crypto Lottery Tickets. <
> Should you buy Pancat cryptocurrency in 2023? <
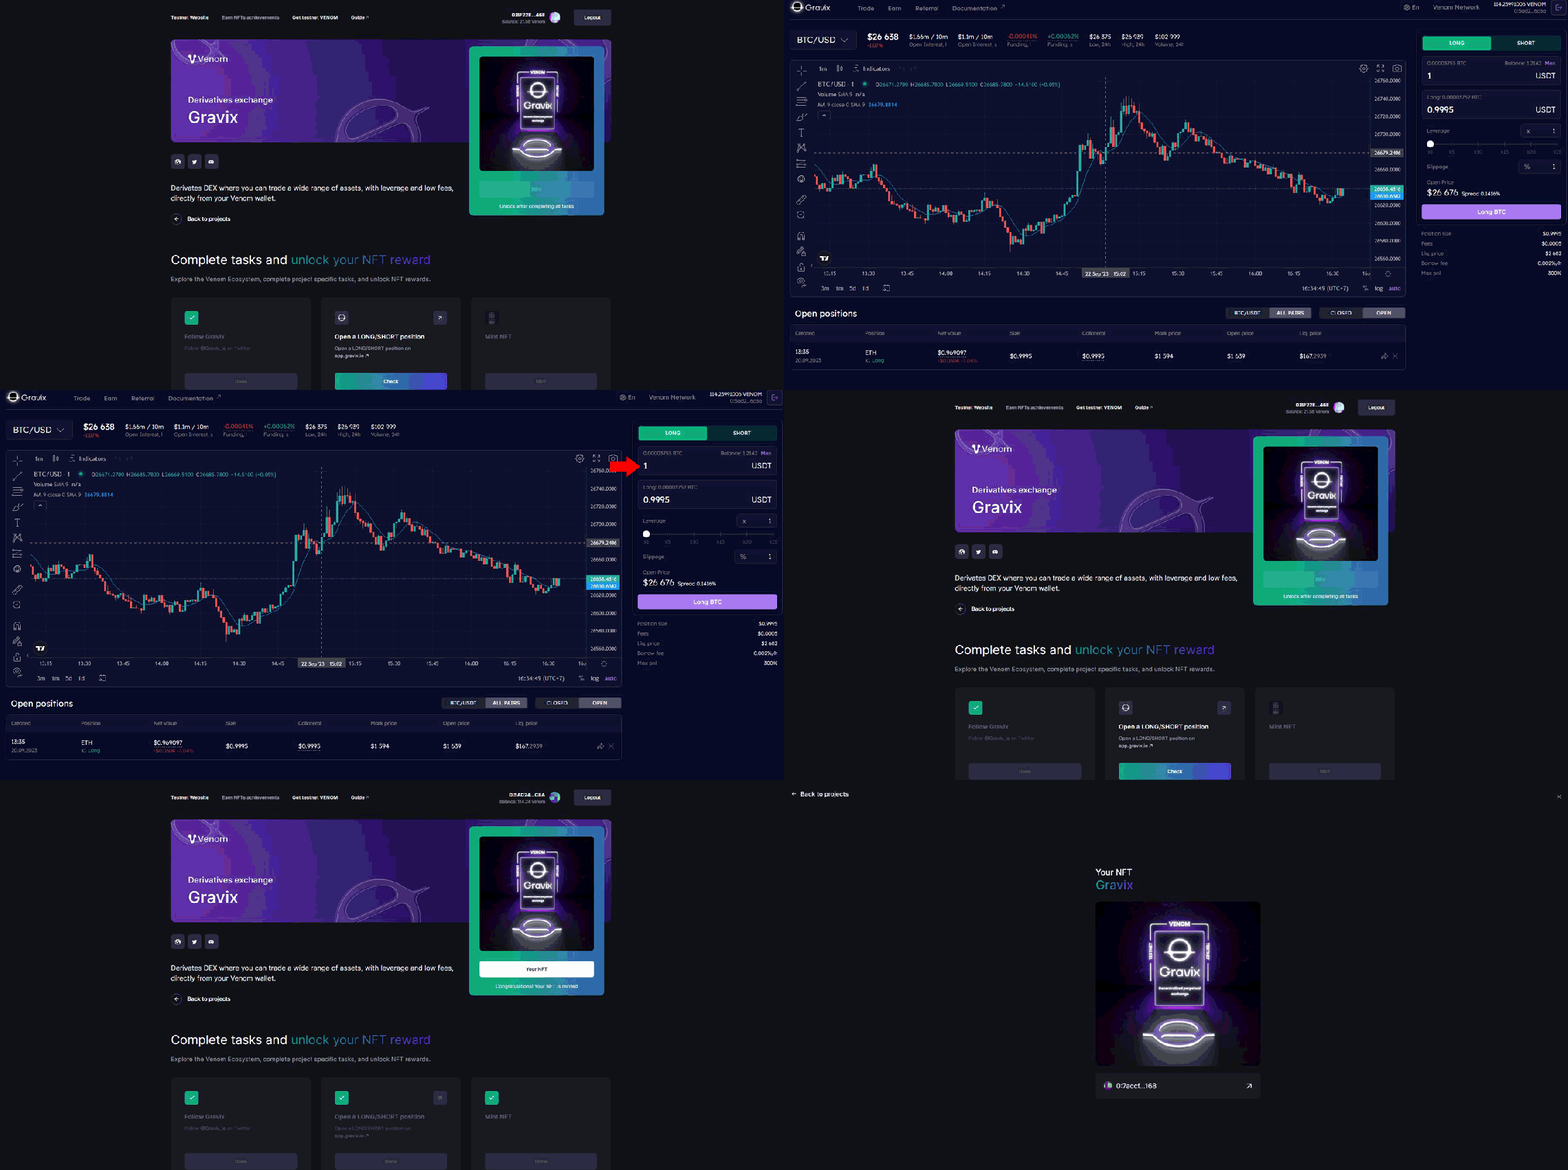
11. Gravix
you need to complete two tasks:
- Follow Gravix
- Open a LONG/SHORT position.
- Go to Gravix exchange site.
- Connect your Venom wallet.
- Use your USDT that you have swapped before and make a LONG/SHORT decision.
Whether you are right or wrong is not important, but this is a good opportunity for you to learn how to place a LONG or SHORT position on crypto exchange platforms.
After finishing the tasks, you can mint your 11th NFT.
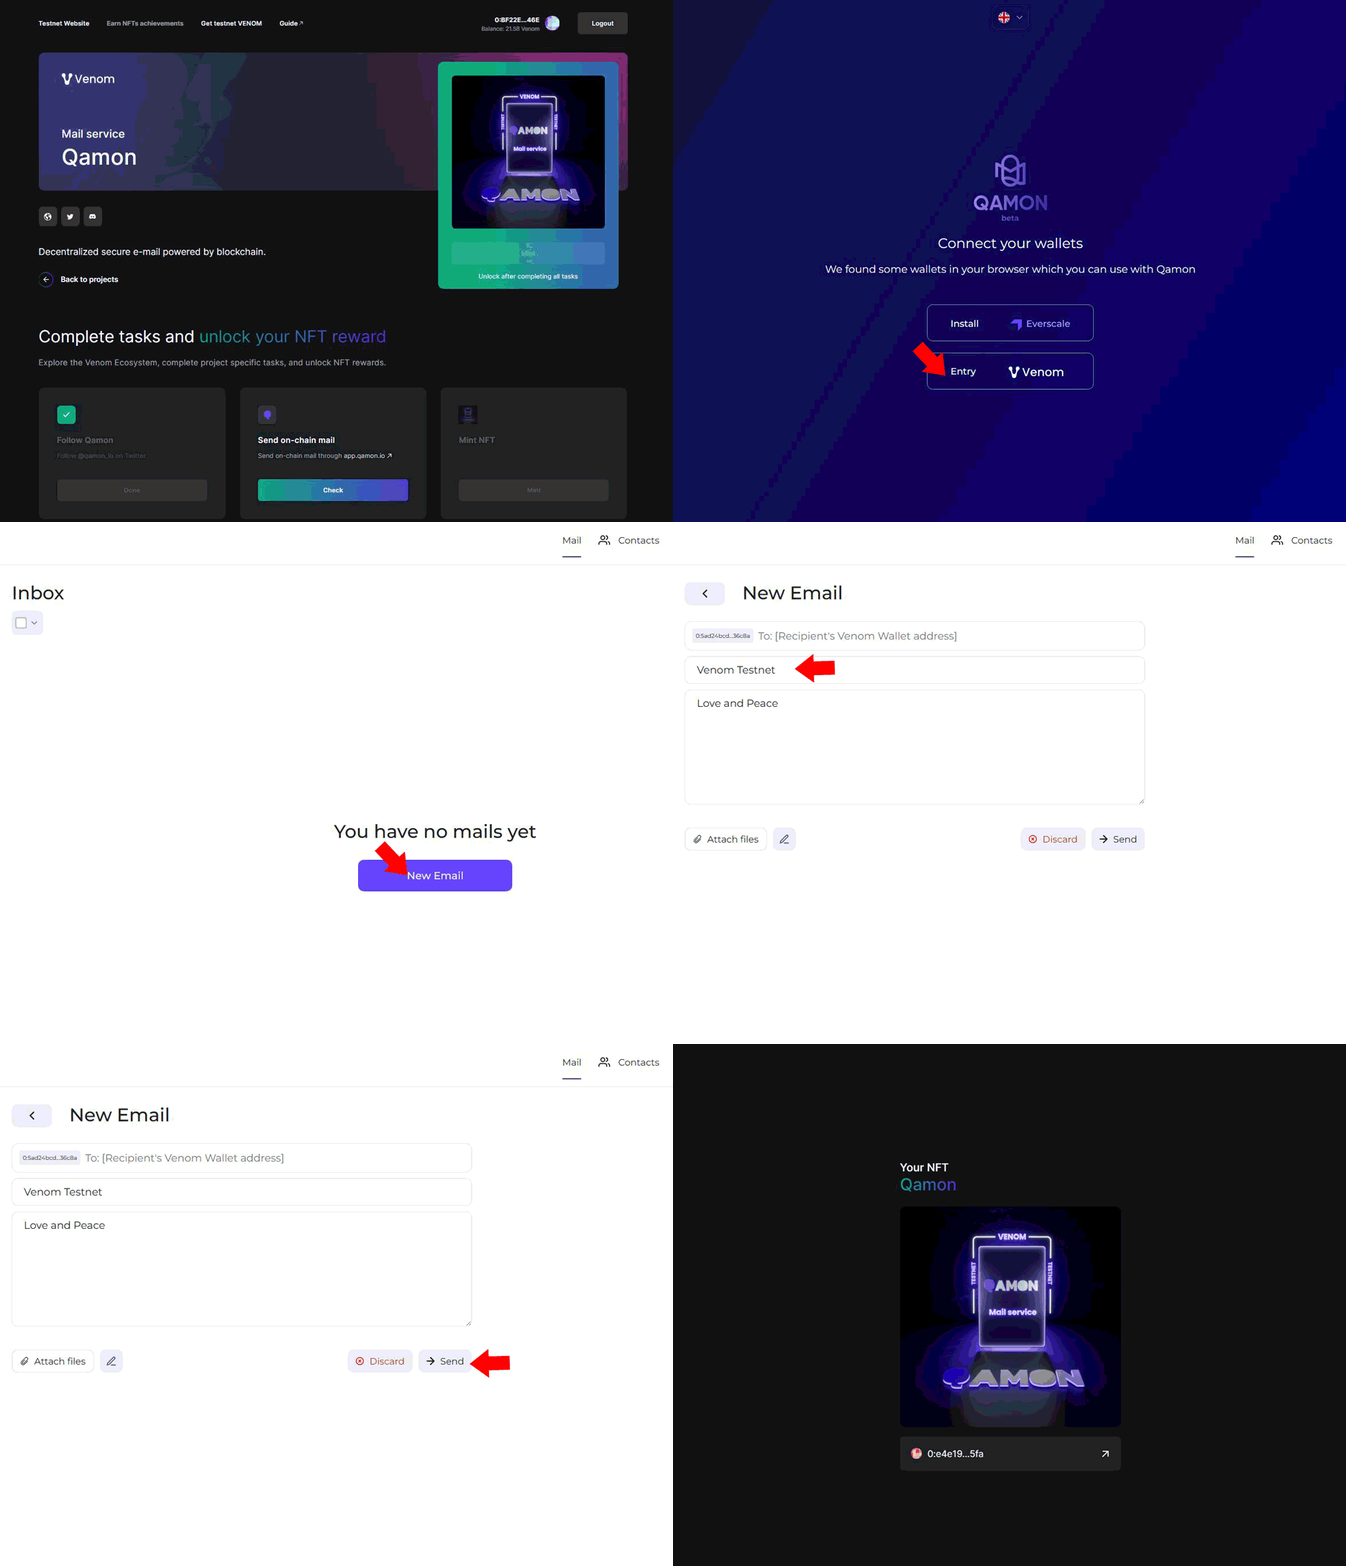
12. Qamon
There are two tasks here:
- Follow Qamon
- Send on-chain mail.
- Go to the Qamon mail.
- Connect your Venom Wallet.
- Start a new email.
- Any Venom wallet address is valid, including the one you own. The most convenient method is to email yourself.
Done all that and you can mint your 12th NFT.
13. Venom Burn
It has two tasks:
- Follow Venom Burn
- Burn your VENOM.
- Go to the Venom Burn website.
- Connect your Venom Wallet
- Click on Burn Your Venom Buton.
- Enter the amount of Venom Token you want to burn.
- Proceed to burn those tokens.
That’s your 13th NFT.

14. OneArt
You need to accomplish two tasks. The first one is very straightforward, but the second one is a bit more complex. Nevertheless, we will assist you in completing it with ease.
- Follow OneArt
- Mint Welcome NFT
- Go to the link in the task to download the OneArt app.
- Download the app with your phone.
- Open the app on your phone and connect your Venom wallet with the 12 seed phrases.
- After connecting the wallet, you can mint the welcome NFT in the OneArt app.
- Go back to the task page and “check” your progression.
Now you can mint your 14th NFT.

15. Valicit
- Follow Valicit
- Buy ticket.
- Go to valicit.com.
- Collect your Venom Wallet.
- Buy the ticket.
- Go back to the task page and hit “check” to finish.
Finishing the two tasks and you can mint your 15th NFT.

> What is Linea Wallet? Find Linea RPC in less than 10 seconds. <
> What is Gitcoin Passport? Airdrop Essential Tool. <
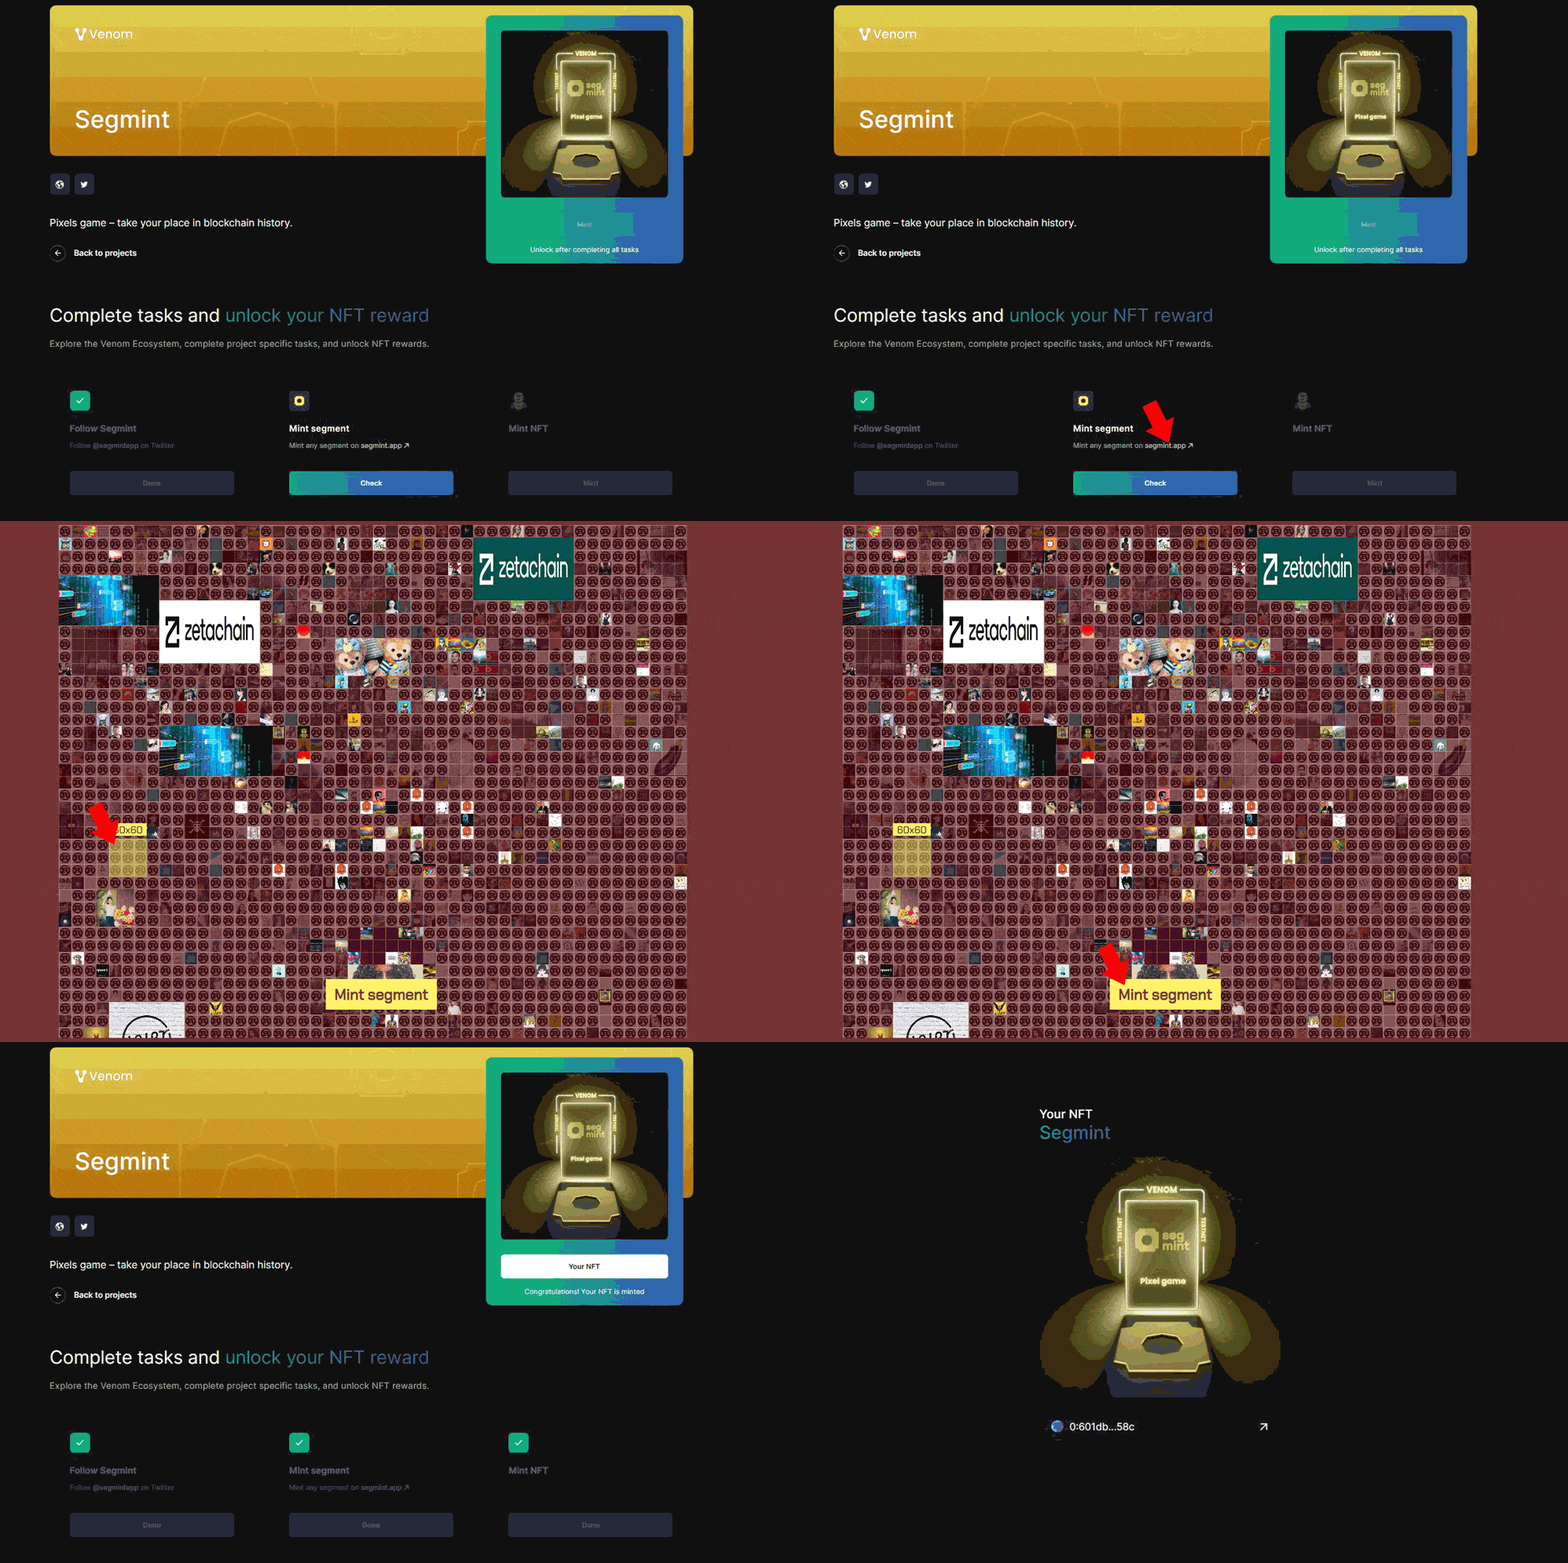
16. Segmint
- Follow Segmint.
- Mint segment.
- Go to Segmint
- Connect your Venom wallet.
- Select a space you want to buy. The price you have to pay will depend on how many “segments” you choose.
- Wait for the page to process and give you the price.
- Proceed to “Mint segment”
- Go back to the task page to complete.
You can now mint your 16th NFT.
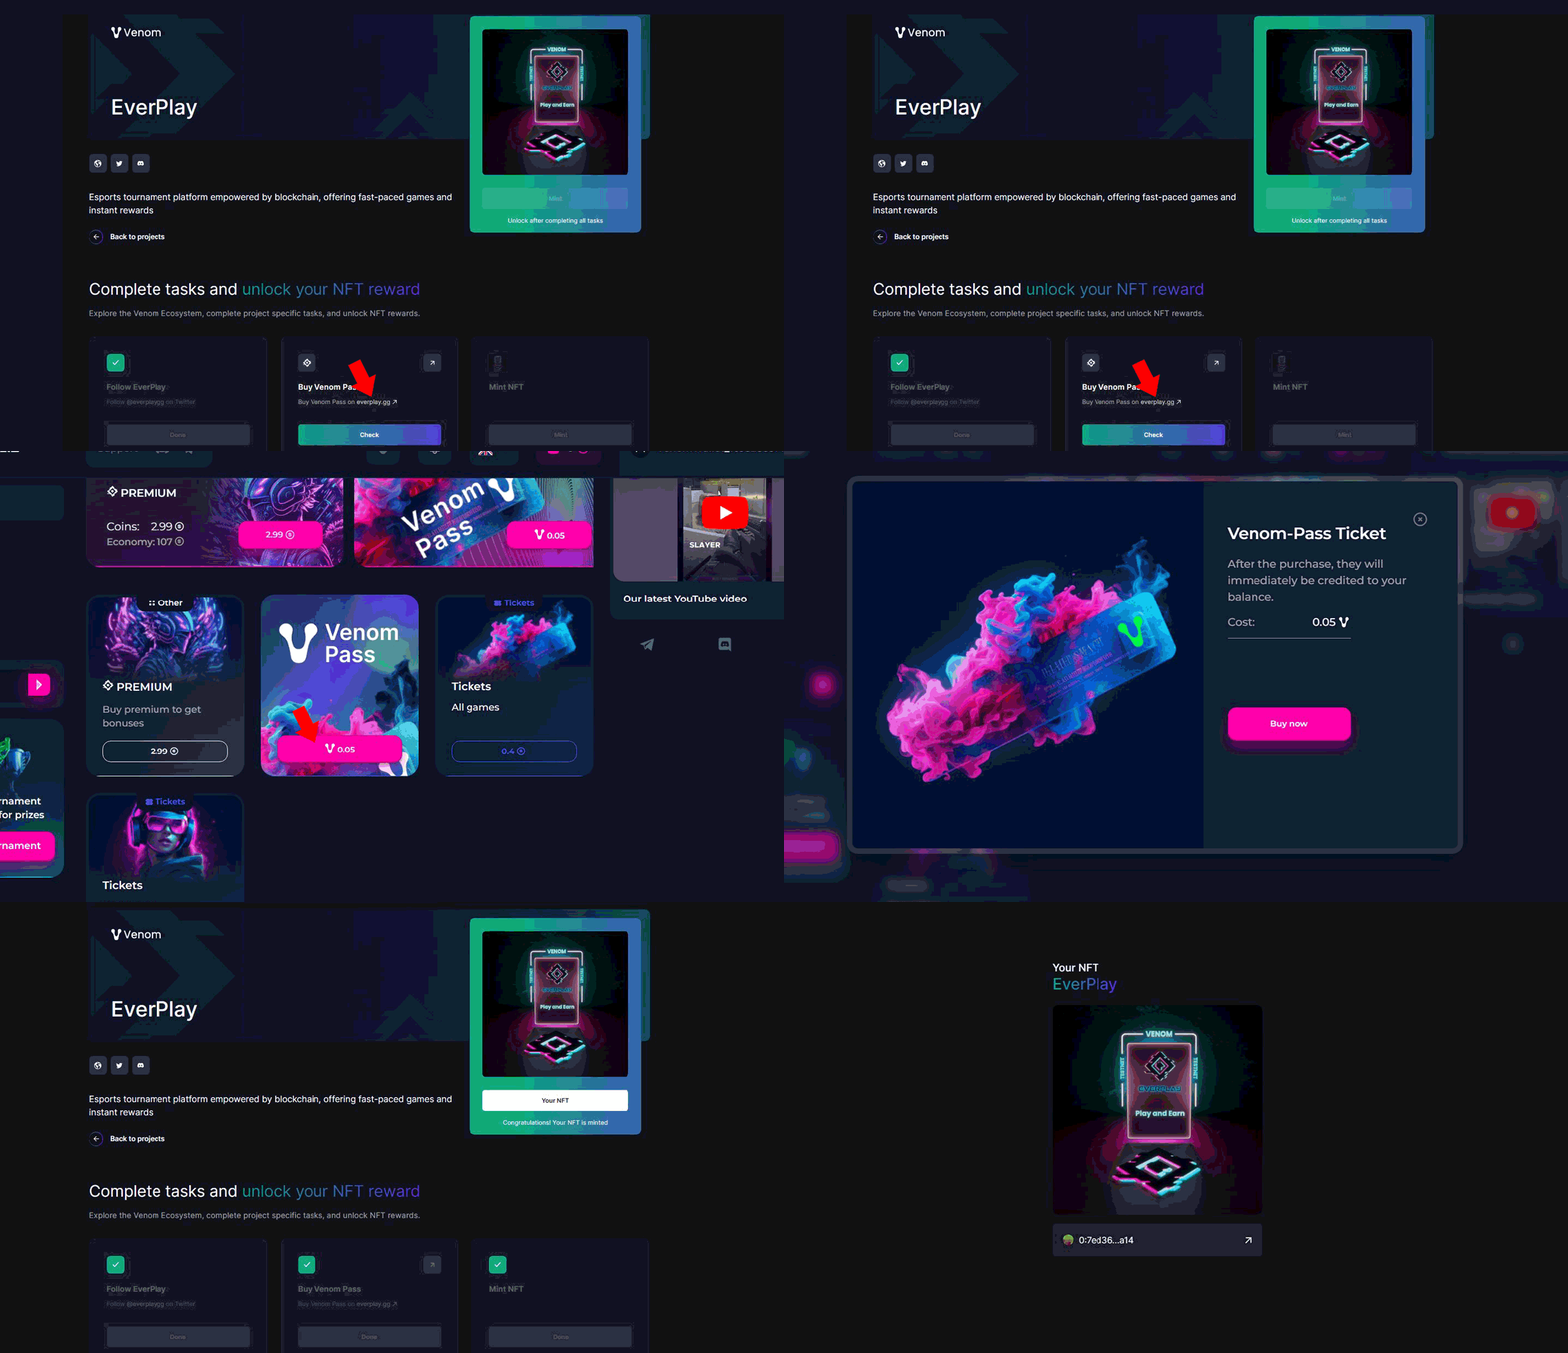
17. EverPlay
You will have to complete two tasks:
- Follow EverPlay
- Buy Venom Pass
- Go to EverPlay site.
- Connect the Venom Wallet.
- Click on “Buy Venom Pass”
- Proceed with the transaction.
- Go back to the task page and “check” the task.
Congratulations! You can now mint for 17th NFT and finish the Venom Testnet Campaign. But there will be more tasks in the future, and we will update this guide ASAP.
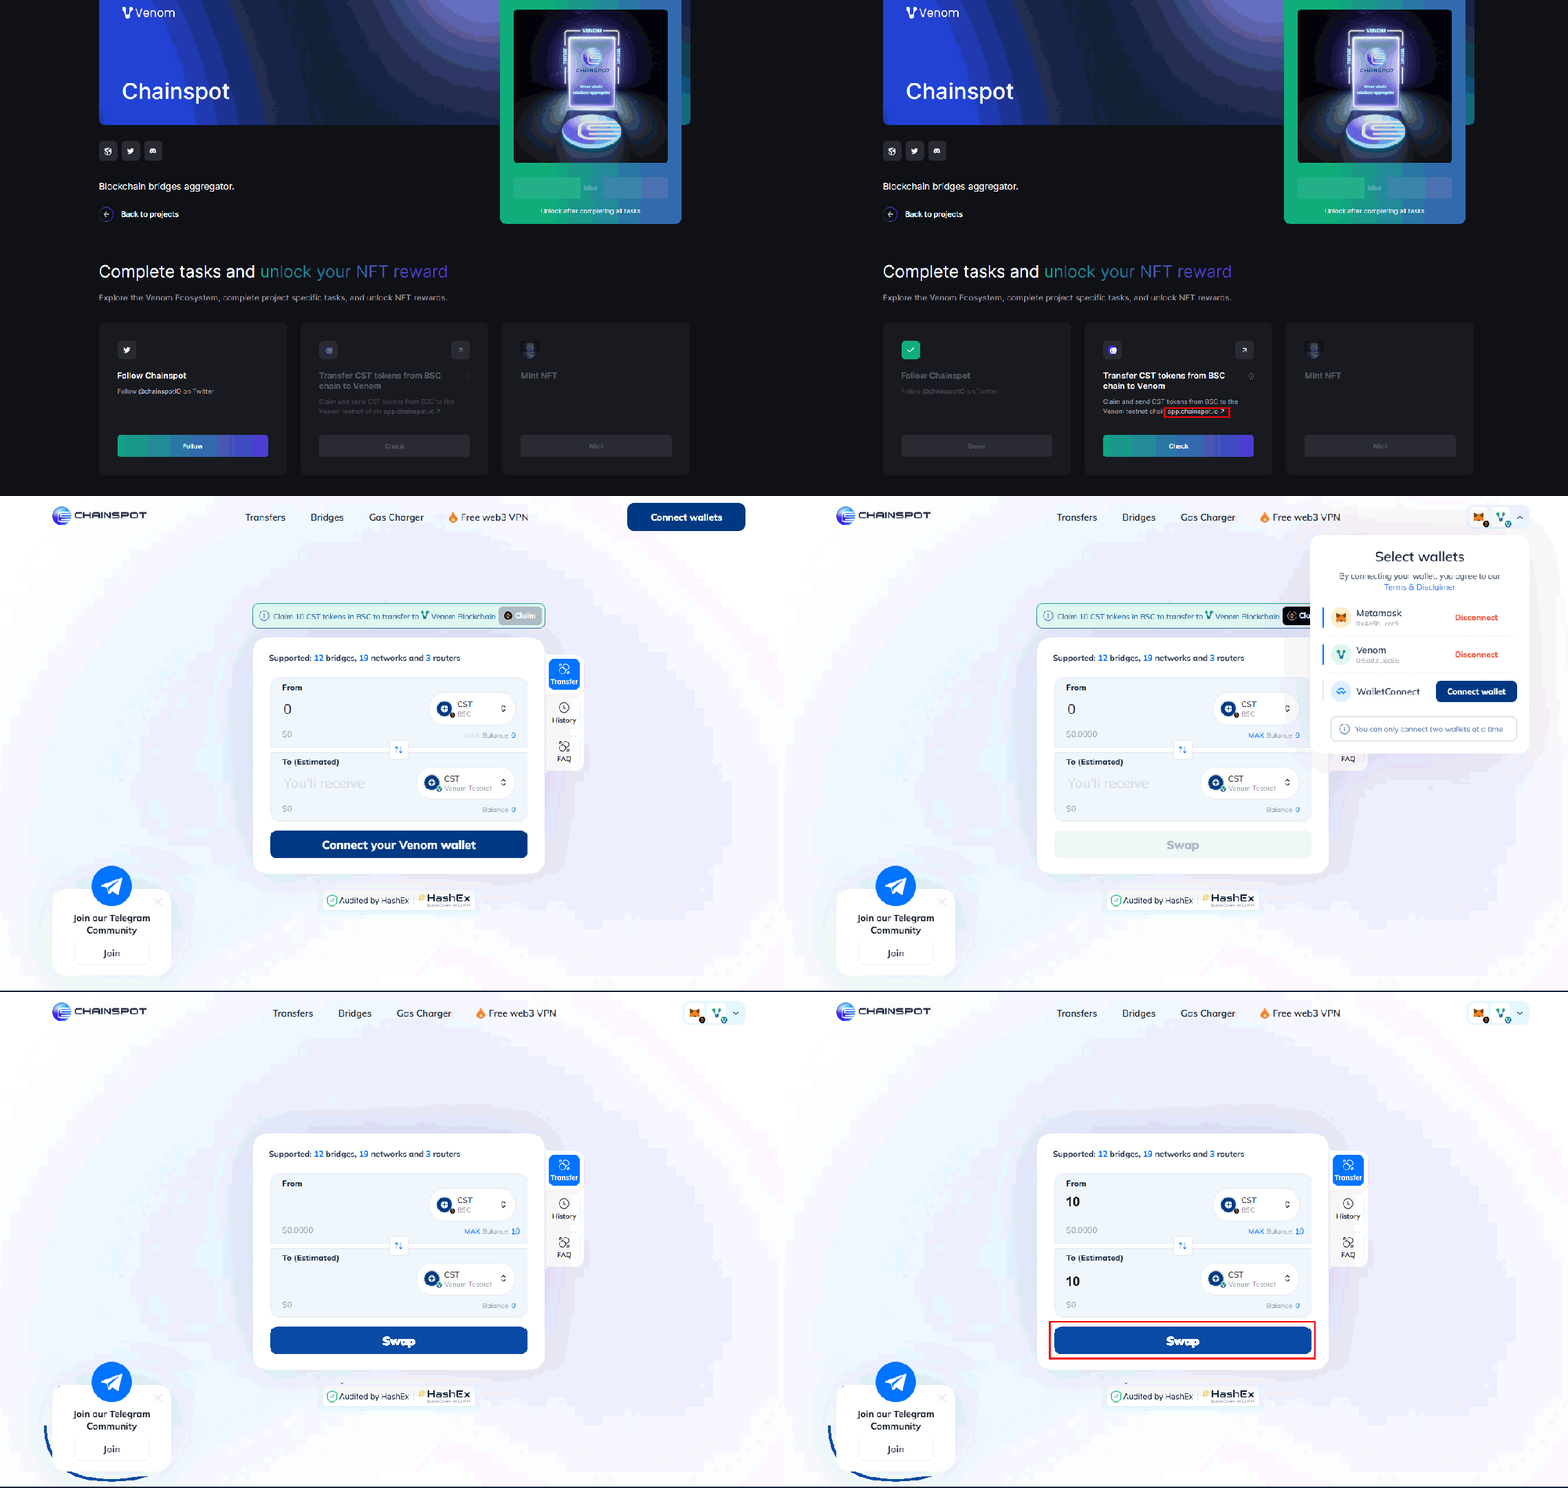
18. Chainspot
Explore Chainspot with two tasks:
- Follow Chainspot on X (Twitter)
- Transfer CST tokens from BSC chain to Venom
- Go to app.chainspot.io
- Connect your MetaMask wallet. Remember to switch to the BSC chain.
- Connect your Venom wallet.
- Claim your 10 CST tokens.
- Swap the CST Tokens from BSC to Venom Testnet.
- Go back to the task page and “check”.
Note: You need to have a small amount of BNB in your MetaMask wallet to pay the fee of the swap.
Finish the two tasks and mint your 18th NFT.
19. Ventory
Two tasks to complete:
- Follow Ventory.
- Participate in Ventory NFT launchpad.
- Go to the Ventory website.
- Connect your Venom wallet.
- Scroll down and click the mint NFT button.
- Pay the fee and wait for the transaction to complete.
- Go back to the task page and “check”.
After finishing the two tasks, you can mint your 19th NFT.

20. VenomArt
The main objective of this task is to mint an NFT on the VenomArt NFT marketplace.
There are 2 things you need to finish:
- Follow VenomArt
- Create NFT
- Click the link in the task.
- Connect your Venom wallet.
- Select the image you want your NFT to be.
- Customize your NFT information if you want to.
- Hit the Mint button.
- Pay the fee and wait for the minting process to complete.
- Go back to the Venom task page and check your progress.
Mint your 20th NFT.

21. Clustex
Clustex stands as a pioneering DEX that harnesses the influential capabilities of contemporary mathematical principles and smart contract architecture crafted exclusively for Venom.
We’re not sure if there’ll be more stuff with Clustex later, but just to play it safe, think about swapping around 10 or more Venom. Since there are lots of ways to grab extra Venom tokens, it shouldn’t be tough to drop 10 or more here.
2 tasks:
- Follow Clustex
- Swap tokens
- Go to Clustex Swap.
- Connect your Venom wallet.
- Remember to select Venom token for the swap.
- Swap about 10 Venom or more to 2POOL token.
- After the swapping complete, go back to the task page.
- Check your work!
Proceed to mint your 21st NFT.

22. Rooster Fights
Rooster Fights is an engaging mobile game that allows you to nurture and battle roosters, acquire unique NFTs, participate in ‘winner takes all’ duels, and potentially claim your opponent’s prized bird.
To complete your initiation into Rooster Fights, there are four essential tasks:
- Follow Rooster Fights on X (Twitter): This step is straightforward; follow Rooster Fights on their official Twitter account.
- Install the Rooster Fights App:
- Follow the provided link to install the app.
- Click the install button and allow the app to install on your device.
- Although not mandatory, it’s recommended to let the installation process complete before moving on. Feel free to uninstall the app after finishing the task.
- Purchase > 750 RSTR tokens:
- When acquiring RSTR tokens, ensure the purchased amount exceeds 750 tokens. Due to potential fluctuations in Venom token prices during the transaction, aiming slightly above 750 tokens—such as 751 tokens—mitigates the risk of receiving an insufficient amount.
- While completing the task with precisely 750 RSTR tokens is acceptable, it might pose an obstacle if the full amount isn’t received.

4. Buy CRS tokens:
-
- This task requires you to purchase CRS tokens using the RSTR tokens converted from the previous task.
- The minimum amount required to be spent is 750 RSTR tokens, which will yield 15,000 CRS tokens.

23. Venom Launch
The time has come as the Venom Network launches its Mainnet. March 18th marks a significant milestone for the Venom Network team as their mainnet is officially activated.
And they also haven’t forgotten to issue one final testnet task – Venom Launch.
The tasks here are extremely simple:
- Tweet about Venom Launch.
- Retweet about Venom Launch
Just click the buttons and check for completion. You may now mint your last Venom Testnet NFT.

[Last Updated: 18 Mar 2024]
Why should you do all the tasks?
While the Venom Network is relatively new, it holds significant promise to become a prominent player in the blockchain industry. The tasks you’ve completed serve the purpose of acquainting you with this network.
Furthermore, being a new project, there’s a strong likelihood of upcoming airdrops. Completing the Testnet Campaign may prove beneficial in unexpected ways down the road.
What is Wrapped Venom (WVenom)?
Let’s clear the confusion first. Wrapped Venom Token and Venom Token hold the same value. So, why do we need Wrapped Venom?
The Venom token, while native to the Venom blockchain, isn’t implemented as a smart contract, preventing it from interacting with other smart contracts on the same blockchain.
The Venom token cannot be used in DeFi protocols because it doesn’t adhere to the TIP-3 standard, which is the standard for tokens on the Venom blockchain. DeFi protocols require TIP-3 for compatibility.
A solution to this is WVENOM, a wrapped version of the Venom token that complies with the TIP-3 standard. Users can convert their Venom tokens to WVENOM at a 1:1 ratio, enabling their use in DeFi protocols.
This conversion process is usually handled automatically by DeFi platforms. Balances of Venom and WVENOM can be checked through the Venom Wallet or the Venom Scanner.
In summary, to use the Venom token in a DeFi protocol, you need to convert it into WVENOM first. This process is typically automated.
How to add a new Blockchain Network to KEYRING PRO Wallet?
As the Venom Network has not yet been released, it does not currently possess a Blockchain ID. However, once it becomes available, you can seamlessly integrate the Venom Network into the KEYRING PRO Wallet by following these steps:
- Download KEYRING PRO wallet.
- Create/import your wallet.
- Go to option!
- Manage Chain.
- Enter the information.
- Add chain.
- Tap on any chain you already have.
- Use this address for other chain.
- Choose the newly added chain.
- All done!


